Fireplace Renovation : German Schmear and Rustic Mantle
No life story here! Let’s just dive right in :)
Total cost $75
Total time about 4 days total
Day 1) remove old mantle and German schmear (about 5 hours total)
Day 2) build new mantle (2 hours)
Day 3) distress the new mantle (about 2 hours)
Day 4) stain
The biggest cost saving tip I can give you here (coming from sara 😂): do NOT go buy a bunch of tools. Ethan is a Lowe’s junkie and has everything, or his dad does, and I guarantee you you have a friend that does too! Or hey you can borrow ours.
The first step of this was removing the old mantle so Ethan will explain how he did that.
Removing the current mantle will depend on how yours is constructed. Ours was built at the time of construction and was assembled from various trim molding pieces, wood glue and lots of finishing nails. The only real option to remove this was to bust it up. We took a rubber mallet to the front top edge and began prying it off with a hammer. From there we just had to work each piece apart until we could see how it had been attached to the brick wall. In our case the 2x4 was mounted with masonry anchors and was able to be reused in the new mantle.
The next part was the German schmear, that was my contribution to the project. This part was so easy and all I needed was
Large format tile mortar
Gallon ziploc bags
A bucket
A ladder
A 3 in putty knife or drywall knife
We mixed the mortar up, filled a gallon ziploc bag, and I began at the top in a small section to test out my technique. Pipe generously into the grout lines in about a 2x3 brick space. Then smooth/scrape in all directions until you get the coverage you would like. I went heavier, but actually would’ve preferred lighter so start light and you can always add more. That’s all! Do the entire fireplace, working from top to bottom. You’ll need to do it all in one go so make sure you have the dedicated amount of time need for this step. They only other tip I have for this part is to just use a new gallon ziploc each time you need to refill with mortar, it’ll help keep it from busting open at the worst times.
From here on out it was all Ethan!
Mantle building
We built the fake beam using 3 1”x8”x6’ boards and 1 1”x10”x8’ board. To put the beam together we cut the boards to length and then used wood glue and pocket holes with screws to secure them. Making pocket holes and using screws isn’t a necessary step and you could definitely just use finishing nails instead. Because the boards were a bit warped I ended up using a couple of finishing nails and some force to push the boards into better alignment and then hold them in place. If you don’t want the nails to be visible use a punch to counter sink them below the wood without leaving a hammer mark.
Distressing
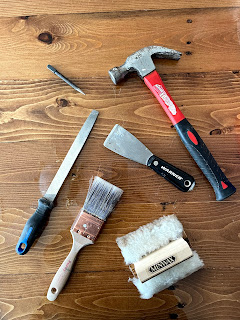
Distressing your wood beam can be done with a wide variety of tools and techniques. It’s important to choose an era you are trying to imitate, for instance if you are trying to imitate a pre industrialized era you don’t want any saw marks, clean cuts or straight lines. We were shooting for a post industrial era look so ours including some marks from modern tools. First I began by using a large file to take all of the straight edges off and round out all the corners. In some spots I would add more force and file for longer to gouge out more would and give an uneven surface. I also used the short edge of the file to make short deep marks that imitate hatchet marks. I then took a hammer and simply hit the board at a steep angle so the hammer made a long dimple across the surface. In some of these spots the broken wood rose up and provided the perfect opportunity for the next tool. I used a 2 inch putty knife, an actual chisel would work way better, as a chisel to scrape those tougher up hammer marks and gouge out more of the wood. In some spots I did this lightly and in others I took out a couple inches of wood. This helps to provide depth to the piece. Then I took a small metal pick and gouged out some areas of the dark softer wood, again to give more depth. I also used this tool and laid it at a sharp angle to the wood and hit it with a hammer to create lines which look sort of like nails used to be in there. I also used the putty knife on the edges to take off more wood in longer sections. Finally I used a saws all and ran it so the blade skipped across the wood to provide a rough sawn look.
Staining
We used minwax oil based wood stain in “early American” #230. For a project this size you can definitely get away with just the small sample can. We applied with a sheep wool applicator but a cotton towel wood do just fine. Be sure to work the stain from darker to lighter areas to get an even color. Let this stain set in over night and then apply two coats of minwax water based polyurethane in flat matte using a paint brush with two hours to dry between coats. Be careful to not spread your clear coat too thin by over brushing.
Final Install
We built our box so that it fit perfectly over the 2x4 mounted to the fireplace and then used two finishing nails to attach it through the top.


Comments
Post a Comment